OpenCAPIF SDK
Network App developers
In the scope of CAPIF, a Network App (Network Application) refers to an external application or service that interacts with the 3GPP network via standardized APIs. These Network Apps typically leverage the capabilities and services provided by the underlying mobile network infrastructure, such as network slicing, quality of service (QoS), or location services.
Network Apps can be developed by third-party service providers, network operators, or other stakeholders to offer a wide range of services, including enhanced communication features, IoT solutions, or content delivery, and they use CAPIF as the unified framework for securely discovering, accessing, and utilizing 3GPP network APIs.
Next image illustrates how CAPIF works and where the SDK provides means to integrate with it:
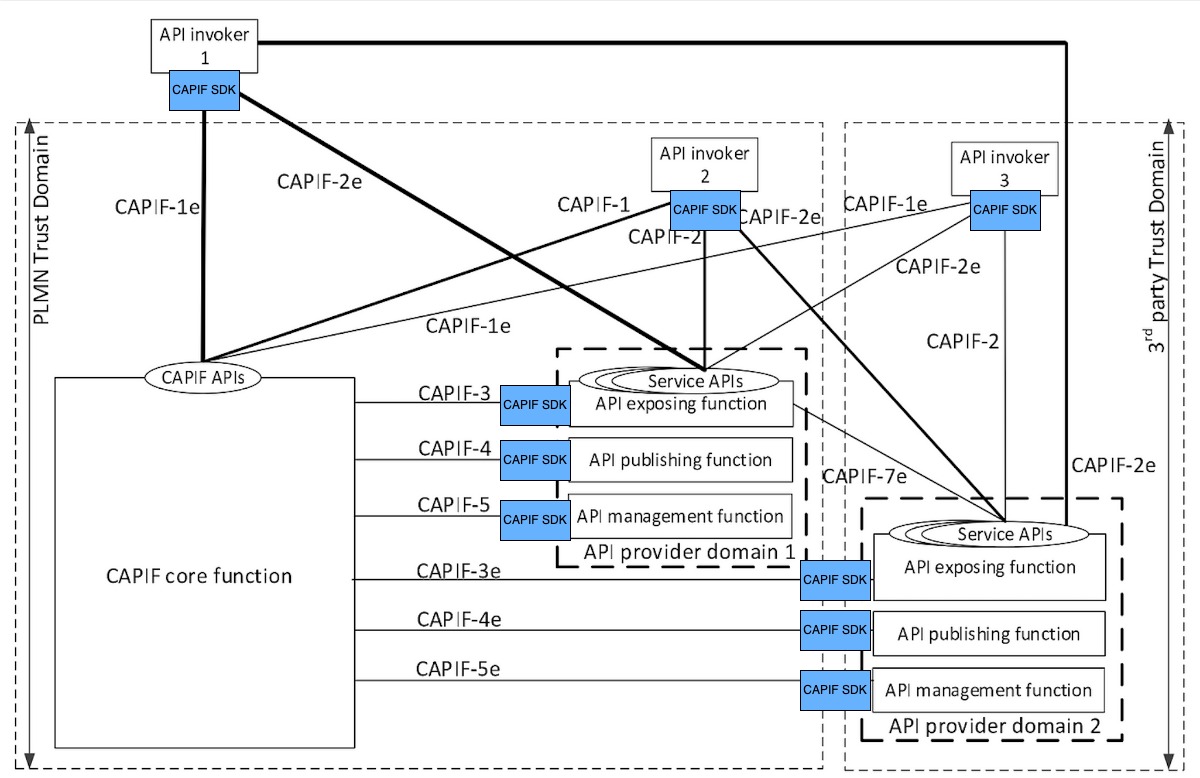
For that purpose Network Apps play 2 different roles when interacting with CAPIF: - Invoker: a Network App acting as an Invoker is responsible for consuming APIs exposed by other services. This role represents an external application or service that calls the 3GPP northbound APIs to utilize the network’s functionalities.
-
Provider: a Network App acting as a Provider is responsible for exposing its own APIs/services for use by Invokers. This role represents an entity that offers services through APIs, making them available to other external applications or Invokers. A provider is also distinguished for having three parts.
-
The AMF (API Management Function), supplies the API provider domain with administrative capabilities. Some of these capabilities include, auditing the service API invocation logs received from the CCF, onboarding/offboarding new API invokers and monitoring the status of the service APIs. One provider can have only one AMF.
-
The APF (API Publishing Function), is responsible for the publication of the service APIs to CCF in order to enable the discovery capability to the API Invokers. One provider can have multiple APFs.
-
The AEF (API Exposing Function), is responsible for the exposure of the service APIs. Assuming that API Invokers are authorized by the CCF, AEF validates the authorization and subsequently provides the direct communication entry points to the service APIs. AEF may also authorize API invokers and record the invocations in log files. One provider can have multiple AEFs
OpenCAPIF SDK brings a set of functions to integrate with the 5G Core's function CAPIF, as defined in 3GPP Technical Specification (TS) 29.222 V18.5.0 Common API Framework for 3GPP Northbound APIs. This section shows the mapping between the Python functions available in this SDK and the CAPIF OpenAPI APIs defined the reference standard:
| 3GPP CAPIF API | OpenCAPIF SDK function | Description |
|---|---|---|
| /onboardedInvokers (POST) | onboard_invoker(supp_features) | Registers a new invoker. |
| /onboardedInvokers/{onboardingId} (PUT) | update_invoker(supp_features) | Updates an existing invoker for a specific onboardingId. |
| /onboardedInvokers/{onboardingId} (DELETE) | offboard_invoker() | Deletes an invoker for a specific onboardingId. |
| registrations (POST) | onboard_provider(supp_features) | Registers a new service provider. |
| /registrations/{registrationId} (PUT) | update_provider(supp_features) | Updates a service provider's registration for a specific registrationId. |
| /registrations/{registrationId} (DELETE) | offboard_provider() | Deletes a service provider's registration for a specific registrationId. |
| /allServiceAPIs (GET) | discover() | Retrieves a list of all available service APIs. |
| /trustedInvokers (PUT//POST) | get_tokens(supp_features) | Registers or updates trusted invokers. |
| /securities/{securityId}/token (GET) | get_tokens(supp_features) | Retrieves a security token for a specific securityId. This JWT token is used to query the targeted services. |
| /{apfId}/service-apis(POST) | publish_services() | Registers a new service API into the system for a specific apfId |
| /{apfId}/service-apis/{serviceApiId} (DELETE) | unpublish_service() | Deletes a service API from the system for a specific apfIdand serviceApiId |
| /{apfId}/service-apis/{serviceApiId} (PUT) | update_service() | Updates the details of an existing service API for a specific apfIdand serviceApiId |
| /{apfId}/service-apis/{serviceApiId} (GET) | get_service() | Retrieves the details of a specific service API for a specific apfId and serviceApiId |
| /{apfId}/service-apis (GET) | get_all_services() | Retrieves a list of all available service APIs for a specific apfId |
| /aef-security/v1/check-authentication (POST) | check_authentication(supported_features) | This custom operation allows the API invoker to confirm the supported_features from the API exposing function(AEF) |
| /api-invocation-logs/v1/{aefId}/logs (POST) | create_logs(aefId, jwt,supp_features) | This operation allows to the Provider to notice to the CCF about the query of an invoker with the JWT token received |
| /capif-events/v1/{subscriberId}/subscriptions (POST) | create_subscription(name, id, supp_features) | This operation allows to the Invoker/AEF/APF/AMF to ask to the CCF about notifications related to certain functionalities. |
| /capif-events/v1/{subscriberId}/subscriptions/{subscriptionId} (DELETE) | delete_subscription(name, id) | This operation allows to the Invoker/AEF/APF/AMF to withdraw the petition to receive notifications related to certain functionalities. |
| /capif-events/v1/{subscriberId}/subscriptions/{subscriptionId} (PUT) | update_subscription(name, id, supp_features) | This operation allows to the Invoker/AEF/APF/AMF to modify to the petition to receive notifications related to certain functionalities. Available from OpenCAPIF Release 2.0 onwards |
| /capif-events/v1/{subscriberId}/subscriptions/{subscriptionId} (PATCH) | patch_subscription(name, id, supp_features) | This operation allows to the Invoker/AEF/APF/AMF to modify to the petition to receive notifications related to certain functionalities. Available from OpenCAPIF Release 2.0 onwards |
NOTE: Above mentioned CAPIF APIs are defined in these 3GPP references:
- CAPIF Invoker API specification
- CAPIF Provider API specification
- CAPIF Discover API specification
- CAPIF Publish API specification
- CAPIF Security API specification
- AEF Security API specification
- CAPIF Logging API management
- CAPIF Events API management
NOTE: In the 3GPP Technical Specification (TS) 29.222 V18.5.0 Common API Framework for 3GPP Northbound APIs the service concept is understood as equal as the API concept.
OpenCAPIF SDK requirements
To use the OpenCAPIF SDK, a registered user account within the target CAPIF instance is required.
Contact the administrator to obtain the required predefined credentials (CAPIF username and password).
OpenCAPIF SDK installation
To install the OpenCAPIF SDK source code for developing purposes there is an available section: OpenCAPIF SDK developers.
To use the SDK, binary installer for the latest version is available at the Python Package Index (Pipy)
The SDK works with Python 3.12
pip install opencapif_sdk
To also run the Network App samples, which need Flask, install the samples extra:
pip install "opencapif_sdk[samples]"
OpenCAPIF SDK logs
The SDK does not configure logging on its own: importing it does not create any file or folder, and it does not change the logging of your application. The SDK writes its messages to loggers named opencapif_sdk.<class name> (for example opencapif_sdk.capif_provider_connector), and the debug_mode setting of the configuration (or the DEBUG_MODE environment variable) decides which ones are emitted: all of them with True, only warnings and errors with False.
If you do nothing, you will not see the SDK logs. To get them, choose one of these two options:
Option 1: default SDK logs. Call enable_default_logging() once, before using the SDK. The SDK logs are written to logs/sdk_logs.log (the folder is created if needed) and to the console, and the rest of your application's logging is not affected:
from opencapif_sdk import capif_provider_connector, enable_default_logging

enable_default_logging()

provider = capif_provider_connector(config_file="capif_sdk_config.json")
You can choose another file, or turn off the file or the console output:
enable_default_logging(log_file="/var/log/my_network_app/sdk.log")  # another file
enable_default_logging(log_file=None)                              # console only
enable_default_logging(console=False)                              # file only
Option 2: your application's own logging. If your application already configures logging, the SDK logs reach your handlers automatically, so you do not need enable_default_logging(). For example:
import logging

logging.basicConfig(level=logging.DEBUG, format="%(asctime)s - %(name)s - %(levelname)s - %(message)s")
With this option you can also see the HTTP requests sent by the SDK, by enabling the urllib3 logger: logging.getLogger("urllib3").setLevel(logging.DEBUG).
Note for users of versions before 1.0.0: the SDK used to configure logging automatically as soon as it was imported, writing to a
logs/folder in the current directory, anddebug_modealso enabled theurllib3debug logs. This no longer happens. Callenable_default_logging()to keep getting the SDK logs, and use option 2 if you also need the HTTP requests. See the SDK release notes.
The Network App samples, the scripts and the testing clients of the SDK repository already call enable_default_logging(). The scripts write to scripts/logs/sdk_logs.log.
OpenCAPIF SDK Data Schema
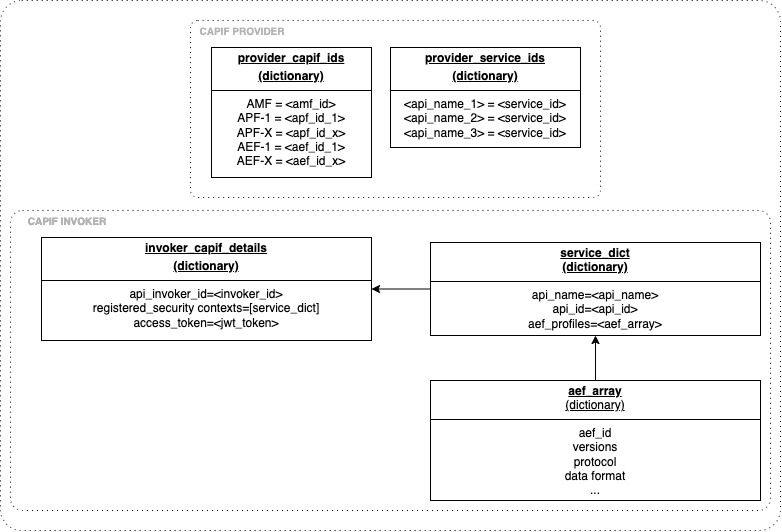
Here is a visual look on the variables of the CAPIF sdk referenced in:
Network App developer path
The Network App Developer Path guides the programmer through building and integrating Network Apps using CAPIF. This path is divided into two key sections: Invoker Network App and Provider Network App. Each section covers the essential flow and functions for developing Network Apps interaction with CAPIF, whether the user is acting as an invoker consuming services or a provider offering them. By following this path, developers will gain a comprehensive understanding of how to effectively use the SDK within the CAPIF ecosystem.
Here is a good explanation about how a usual flow of a Network App should work: usual flow example
Provider Network App
A Network App development running as a Provider would typically follow this process step by step, making use of the SDK:
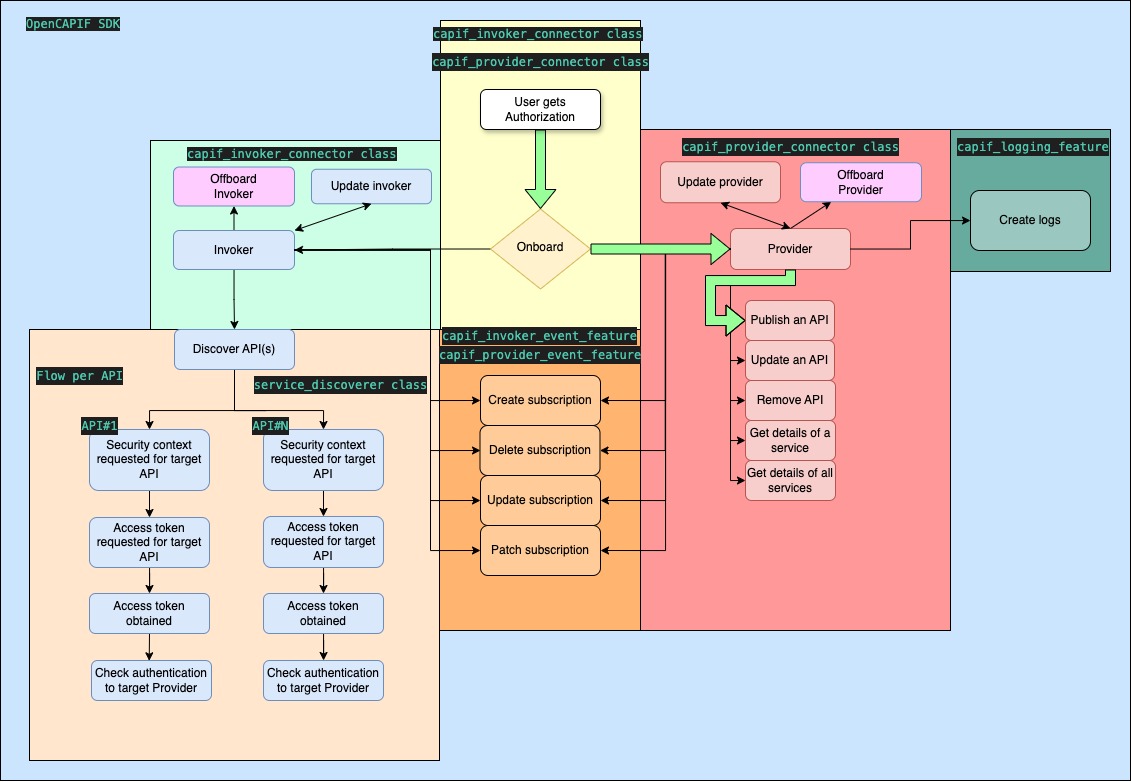
Now, it is described in 4 simple steps how a Provider can be developed in just some code lines, below snippet. It describes the usual flow a Provider would follow to publish an API service.
  import opencapif_sdk

  provider = opencapif_sdk.capif_provider_connector(config_file="path/to/capif_sdk_config.json")
  provider.onboard_provider()

  #translator = opencapif_sdk.api_schema_translator("./path/to/openapi.yaml")
  #translator.build("https://192.168.1.10:8080/exampleAPI/v1", "0", "0")

  provider.api_description_path = "./api_description_name.json"

  APF = provider.provider_capif_ids["APF-1"]

  AEF1 = provider.provider_capif_ids["AEF-1"]
  AEF2 = provider.provider_capif_ids["AEF-2"]

  provider.publish_req['publisher_apf_id'] = APF
  provider.publish_req['publisher_aefs_ids'] = [AEF1, AEF2]
  provider.supported_features ="4"
  provider.publish_services()
Code is next explained step by step:
-
Create a Provider object: Initialize the provider by creating an instance of the
capif_provider_connectorclass, passing the required configuration file.Make sure that the configuration file is filled before creating the instance.
-
Onboard the Provider: Register the provider with the CAPIF system to enable the publication of APIs:
In this phase, the SDK creates and stores all the necessary files for using CAPIF as a provider, such as the authorization certificate, the server certificate and each of the APFs and AEFs certificates. Furthermore, it creates a file named
provider_capif_ids.json, which stores important information about the provider. -
Prepare API details: In the
provider_folder, more specifically in thecapif_usernamefolder, it will be sotres the provider API details file. This file contains all the APFs and AEFs IDs that have already onboarded with thiscapif_username.It is also important to have previously prepared the API schema description file of the API to be published. This file must follow the CAPIF_Publish_Service_API 3GPP specification.
If the API is defined in an Openapi.yaml format, the sdk has a facility which creates automatically the API schema description. For using this functionality uncomment the translator lines. More information: Translator functionality
Choose one APF and the AEF identifiers, and fulfill the
publish_reqstructure and theapi_description_path.The
provider_capif_idsvariable is a dictionary which contains key-values of all the APFs and AEFs stored as name: ID.This
publish_reqfield can also be filled with object variables already stored at provider object. -
Publish the services: Use the
publish_services()method to register the APIs with the CAPIF framework. In this phase, the SDK does the publishing of the provided API specification.
At the end of this step, the API will be available for Invokers to be consumed.
Now, Provider Network App is ready to receive requests from Invokers.
Provider Network App sample
This repository provides an implementation sample of a Provider-Network App.
In this sample, the provider onboards, publishes two APIs, 6G-resilience (nef_upf_vendor_1.json) and 5G-Network-App-API (nef_upf_vendor_2.json), and starts the servers of both APIs on the local machine. Run it from its folder, after installing the samples extra:
cd network_app_samples/network_app_provider_sample
python network_app_provider.py
The servers of the sample work as AEFs:
- They use HTTPS, at
https://localhost:8088(6G-resilience) andhttps://localhost:8888(5G-Network-App-API), the addresses published in the API descriptions. - Their TLS certificate is self-signed and valid for
localhost. The sample creates it the first time it runs, in itsaef_server_certificatefolder (aef_server.crtandaef_server.key). It is only meant for local tests: a real AEF needs a certificate for its own host name, issued by a CA that its invokers trust. - The API resources require the access token issued by CAPIF to the invoker (
Authorization: Bearer <token>), which they validate with the public key of the CAPIF certificate. Thecheck-authenticationoperation (POST /aef-security/v1/check-authentication) does not require it, as it uses HTTPS with server authentication only.
Important information for Provider consumers
Within the provider_folder, the SDK stores the created folders named with prefix of the provided capif_username that has been registered from administrator. At each folder, there will be found the following files:
provider_capif_ids.json: contains all the APFs and AEFs ids that have already onboarded with thiscapif_username,capif_<api_name>_<api_id>_api.json: if it is already published or updated an API, it will contain a copy of the last payload,service_received.json: if it is already used to get an API or get all APIs functionality, it will contain the response of last request,provider_service_ids.json: contains the currently published APIs with theirapi_id.
All the configuration values are available within the object capif_provider_connector.
The provider_service_ids variable stores the provider_service_ids.json content in a dictionary form.
The provider_capif_ids variable stores the provider_capif_ids.json content in a dictionary form.
Invoker Network App
A Network App development running as an Invoker would typically follow this process step by step, making use of the SDK:
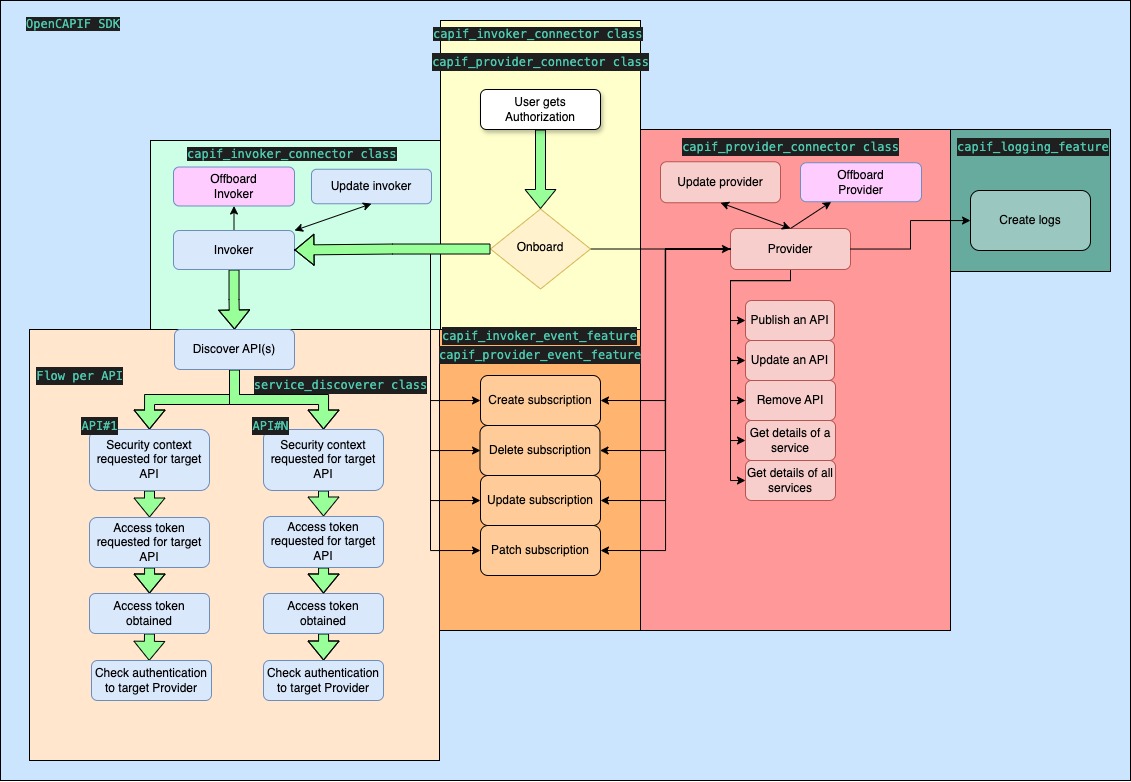
Now, it is described in some simple steps how an Invoker can be developed in just some code lines. Find below the code snippet. It describes the usual flow an Invoker would follow to consume APIs from CAPIF.
  import opencapif_sdk

  invoker = opencapif_sdk.capif_invoker_connector(config_file="path/to/the/capif_sdk_config.json")
  invoker.onboard_invoker()
  service_discoverer = opencapif_sdk.service_discoverer(config_file="path/to/the/capif_sdk_config.json")
  discovered_apis = service_discoverer.discover()
  service_discoverer.get_tokens()
  jwt_token=service_discoverer.token
Code is next explained step by step:
-
Create an Invoker object: Initialize the invoker by creating an instance of the
capif_invoker_connectorclass, passing the required configuration file.Make sure that the configuration file is filled out before creating the instance.
-
Onboard the Invoker: Register the target invoker with the CAPIF system to enable access to APIs.
In this phase, the SDK creates and stores all the necessary files for using CAPIF as a invoker, such as the authorization certificate and the server certificate. Furthermore, it creates a file named
capif_api_security_context_details-<capif_username>.json, which stores important information about the invoker. -
Create a Service Discoverer object: Initialize the service discovery mechanism to search for available services(APIs) in CAPIF.
The
invokersection of the configuration must includesecurity_context.pref_security_contextwith at least one security method (see Choosing the security methods below); otherwise, creating theservice_discovererraises aValueError. -
Discover available services: Use the
discover()method to retrieve a list of available APIs. In this phase, the SDK finds all the available APIs for the invoker. Consequently, it saves the most important information and stores it within thecapif_api_security_context_details-<capif_username>.json.discover()also returns the response of CAPIF, whoseserviceAPIDescriptionsfield lists the discovered APIs, orNoneif no API was found. -
Retrieve security tokens: Use the
get_tokens()method to obtain the necessary tokens for authenticating API requests. It first sets up the invoker's security context in CAPIF for all the discovered APIs, and then requests the token.DISCLAIMER: The first time the security context is set up for a CAPIF user, a warning like the following is shown:
WARNING - Received 404 exception from target CAPIF. This means it is the first time this CAPIF user is getting the JWT token, redirecting to register security service in CAPIF. The process continues correctly.This alert is expected because the SDK tries to update the security context first. If a 404 error is received, it means the security context is not created yet, so the next step for the SDK is to register a new security service.
To check the security context before requesting tokens,
get_security_context(supp_features)sets it up in the same way and returns the response of CAPIF. ItssecurityInfofield shows, for each API, the security method selected by CAPIF (selSecurityMethod):security_context = service_discoverer.get_security_context(supp_features="0") for security_info in security_context["securityInfo"]: print(security_info["apiId"], security_info["selSecurityMethod"])
At the end of this flow, the invoker has been onboarded and it is ready to use target APIs. All required information, including the access_token to use the available APIs, is stored at capif_api_security_context_details-<capif_username>.json file. This file is placed in the invoker_folder path, specifically in the folder that corresponds to the capif_username used in the capif_sdk_config.json. A sample of the capif_api_security_context_details is also available.
Now, Invoker Network App can use access tokens to consume real services.
Choosing the security methods
The security methods that the invoker requests to CAPIF are mandatory: set security_context.pref_security_context in the invoker section of the configuration, with at least one of OAUTH, PKI and PSK, in order of preference. This list is sent to CAPIF as the preferred methods for every discovered API, and CAPIF selects one of them for each API (see selSecurityMethod above).
"invoker": {
  "security_context": {
    "pref_security_context": ["OAUTH", "PKI", "PSK"]
  }
}
It can also be set with the INVOKER_SECURITY_CONTEXT_PREF_SECURITY_CONTEXT environment variable, which takes precedence over the configuration file, as a comma-separated list or a JSON list:
export INVOKER_SECURITY_CONTEXT_PREF_SECURITY_CONTEXT=OAUTH,PKI,PSK
Values are case-insensitive. If it is missing, empty or contains any other value, creating a service_discoverer raises a ValueError.
Invoking the discovered APIs
Once the APIs are discovered, invoke_api() calls them with the security method that CAPIF selected for each one: for OAUTH it obtains, caches and renews the access token of that API and sends it in the Authorization header, and for PKI it uses the certificate obtained when onboarding the invoker. For PSK, it connects with TLS-PSK using a pre-shared key that it derives when it creates the security context, which requires Python 3.13 or later and OpenCAPIF 5.1.0 or later (see PSK security method). The address of the AEF is taken from the discovered API, and requests always use HTTPS.
response = service_discoverer.invoke_api(
    api_name="6G-resilience",
    method="POST",
    resource="RESILIENCE_MANAGEMENT",   # a published resourceName (or path="/resilience")
    body={"profileId": 3},
    aef_id="AEF...",                    # required if several AEFs expose the API
)
More information, including get_api_session() and the errors: Invoke APIs.
Invoker Network App sample
Here is a code sample of the implementation of an Invoker-Network App.
In this sample, the invoker will discover the APIs published by the sample provider shown in this document and will return the access token for querying the APIs. This sample is prepared to run after the Provider-Network App.
Make sure that the Provider-Network App is running before following this implementation.
For testing APIs availability, after running both samples(Provider-Network App and Invoker-Network App) the invoker app will return the access token.
Run it from its folder. Its configuration trusts the certificate of the provider sample servers through api_invocation.ca_cert, so invoke_api() and check_authentication() can verify them. For example, to call one of the sample APIs (aef_id is needed because two AEFs expose it):
response = discoverer.invoke_api("6G-resilience", "GET", resource="RESILIENCE_MANAGEMENT", aef_id="AEF...")
Also, in the same Invoker-Network folder is available a Postman collection and environment. In order to test these APIs, the access token returned in the Invoker-Network App must be set in the Postman environment, more specifically in the access_token variable.
Another alternative is to import the Postman collection and environment in your own postman account, and let the Invoker-Network App update the access token in your Postman environment. To do so, set your Postman API key and environment ID as environment variables before running it (never write them in the code):
export POSTMAN_API_KEY="AAAA-your-apikey"
export POSTMAN_ENVIRONMENT_ID="your-environment-id-must-be-here"
If these variables are not set, the Invoker-Network App skips the Postman update.
The Postman requests use HTTPS. As the certificate of the sample servers is self-signed, add aef_server.crt as a CA certificate in Postman (Settings > Certificates > CA certificates), or turn off SSL certificate verification for these requests.
Important information for Invoker consumer
In the invoker_folder, it will be located several folders with each capif_username it has been onboarded as a provider. For each folder, it will be found:
-
capif_api_security_context_details-<capif_username>.json: This file contains the information of the invoker. It will contain:- The
api_invoker_id, - If the Service Discovery Functionality has already been used , it will be found all the available APIs with their information,
- If the Service Get Token functionality has already been used , it will be found the access token for using the APIs that has already been discovered.
- The
The token variable is also available for retrieving the JWT token after the get_tokens() method.
The invoker_capif_details variable stores the capif_api_security_context_details-<capif_username>.json content in a dictionary form.